General Information
Thank you for purchasing our theme! We really appreciate it and ready to help you!
Theme Requirements
To use TechSmart, make sure your hosting provider is running the following software:
- WordPress 4.9 or higher.
- PHP 7 or greater. WordPress officially suggests to use PHP 7.2.
- MySQL 5.6 or greater.
Recommended PHP Limits
max_execution_time = 120
memory_limit = 128M
post_max_size = 64M
upload_max_filesize = 64M
max_input_time = 60
max_input_vars = 3000
Also consider upgrading your PHP version to the latest version, the newer the better.
Licenses
With ThemeForest regular license you are licensed to use this theme to create one single End Product (the final website customized with your content) for yourself or for one client.
With a single regular license you are not allowed to create multiple websites. For multiple websites you will need multiple regular licenses.
To resell the same website (Single End Product) to another clients. You will need to purchase an extended license for this.
For more information regarding license regulations and policies, see the links below:
Help & Support
If you have any questions please send your questions to send message via our profile. We will respond as soon as possible (within 24 – 48 hours, usually faster).
IMPORTANT:We do not provide support for additional customization, 3rd party plugins integration or any other compatibility issues that might arise. If you need additional customization or integration you can hire us. Just send your propostion to us.
Theme Installation
You have two ways for theme installation:
- Theme Installation Via FTP/Cpanel
- Theme Installation Via WordPress Dashboard
Theme Installation Via FTP/Cpanel
To Install the theme via FTP/Cpanel follow these steps:
- Download a Copy of Theme zip file from Themeforest.
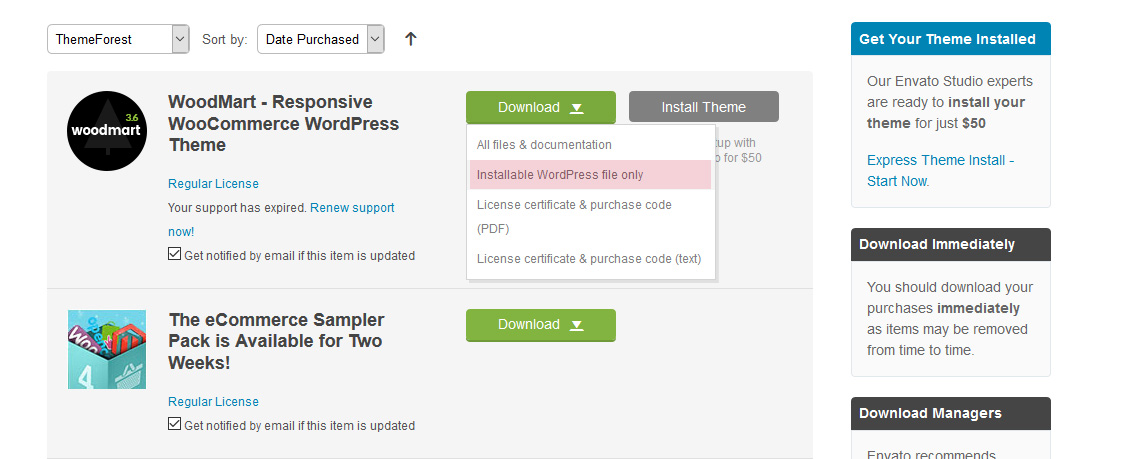
- Save the downloaded theme zip file in your hard drive.
- Extract the downloaded zip file.
- Next step: connect the FTP server using the FTP details and copy the extracted folder to your WordPress theme directory (/wp-content/themes/).
- Login WordPress Dashboard and navigate to the Appearance > Themes tab and activate the theme
Theme Installation Via WordPress Dashboard
To install the theme via WordPress Dashboard follow these steps:
- Download a Copy of Theme zip file from Themeforest.
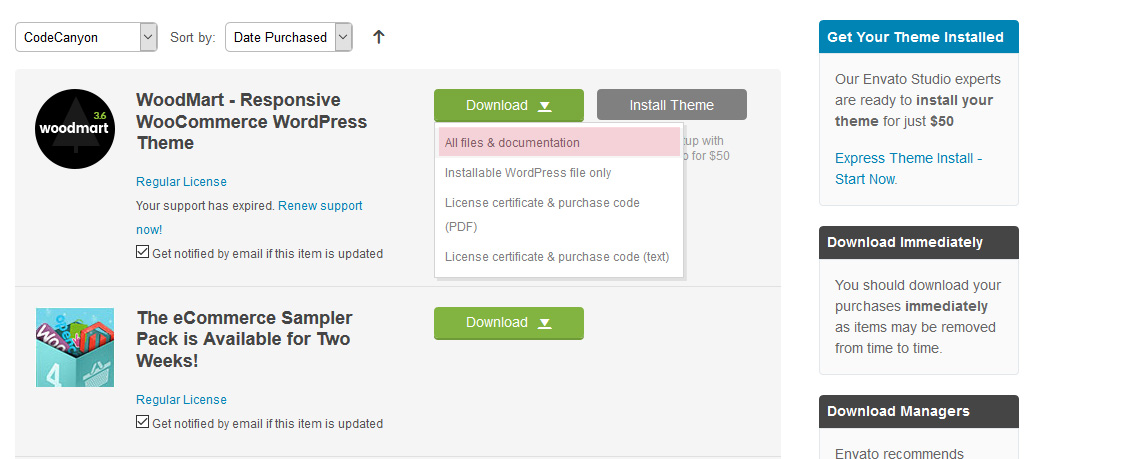
- Save the downloaded theme zip file in your hard drive.
- Extract the downloaded zip file.
- Login into WordPress Dashboard.
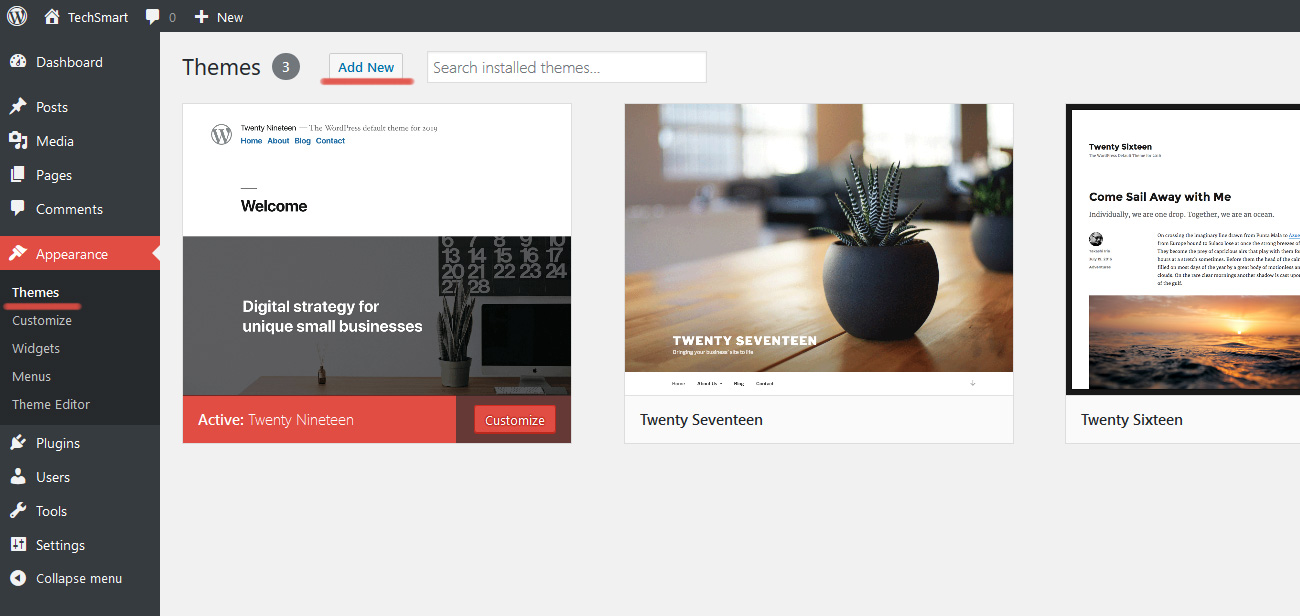
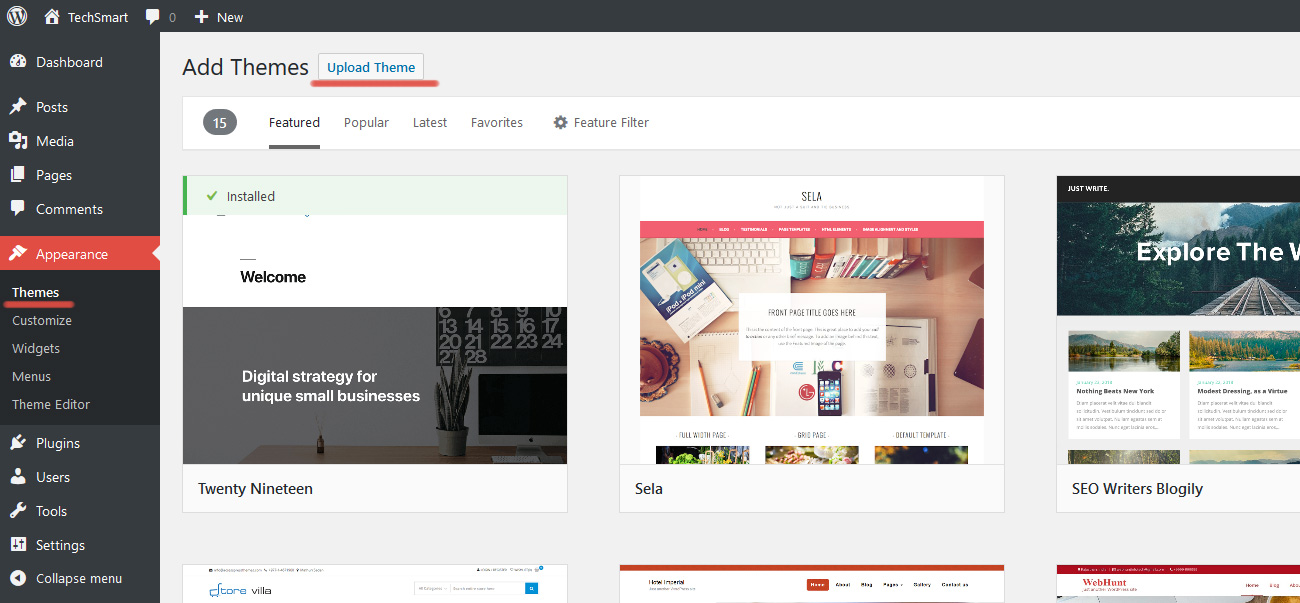
- Go to Dashboard > Appearance > Themes and click on Add New and Upload Theme.
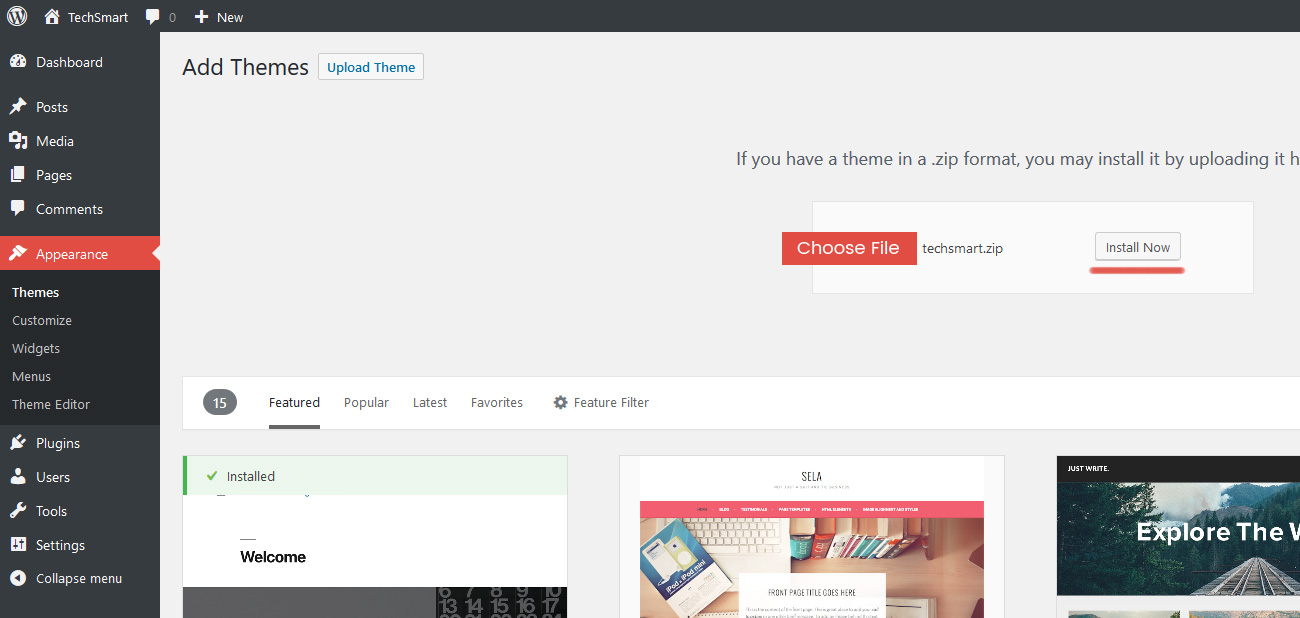
- Select the techsmart.zip folder and click Install Now button..
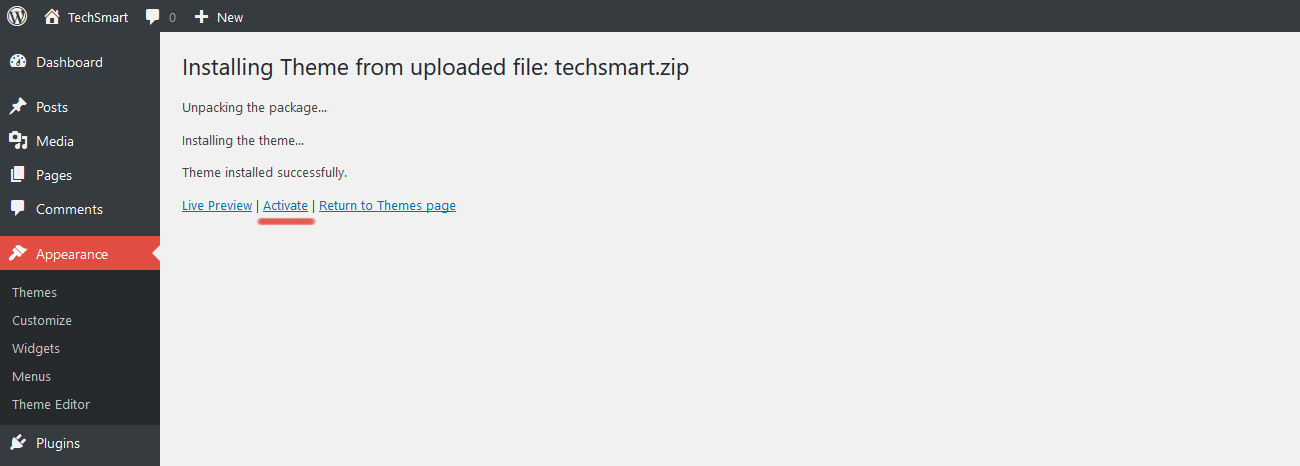
- After the successful installation, click on Activate or navigate to the Appearance > Themes and click on Activate button to activate the newly installed theme
See screenshots below:
Plugins Installation
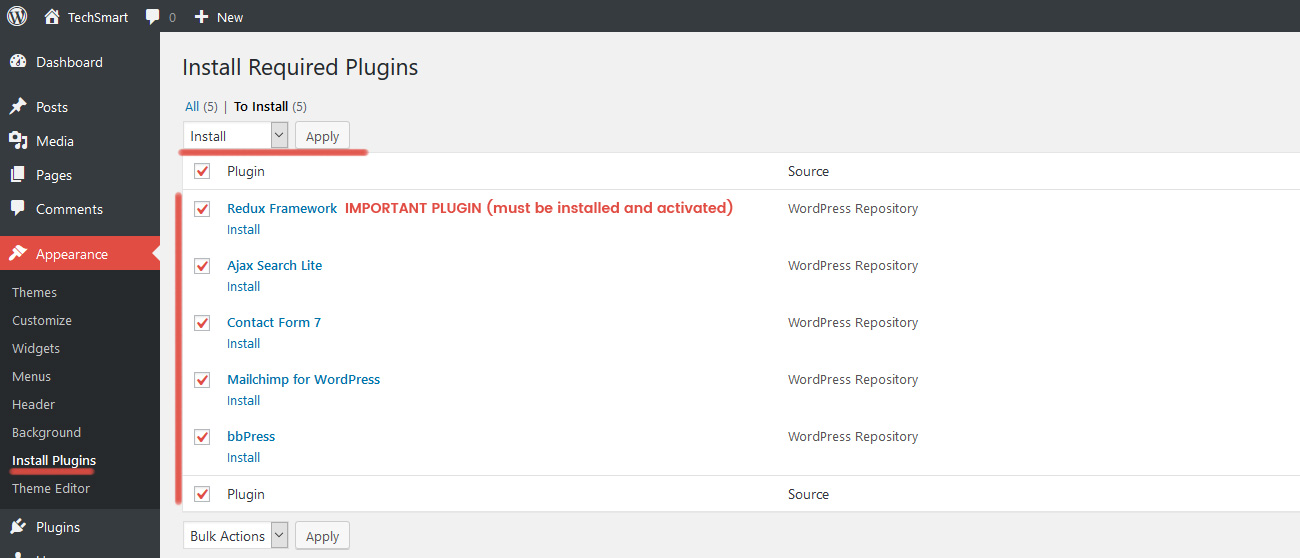
List of plugins that come include into the theme:
Theme Required Plugin is Redux Framework (theme options). And recommended the following plugins: Ajax Search Lite, Contact Form 7, MailChimp for WordPress and bbPress

Demo Content
Now TechSmart theme has 8 variations of the demo. You can download and import demo content for each demo site. See links below:
- Flex Boxes
- Full Width Rows
- Flex Boxes + Sidebar
- Slider Revolution
- Dark Style
- Blog + Sidebar
- Full Width Blog
- Forums
How to import demo content?
1. Download .zip archive with demo content
2. Unzip demo archive
Each archive includes 4 files:
- techsmart_content_import.xml - All content (pages, categories, posts, images, comments and other). For importing this content you have to install WordPress Importer Plugin
- techsmart_customizer_import.dat - WordPress Customizer options. For importing this data you have to install Customizer Export/Import Plugin
- techsmart_redux_copy_data.txt - Redux Framework file with Theme Options. In admin panel go to "Theme Options -> Import/Export" and click "Import From File" button. Paste all text from techsmart_redux_copy_data.txt and click button "Import". That's all.
- techsmart_widgets_import.wie - All widgets. For importing all widgets you have to install Widget Importer & Exporter Plugin
Theme Options
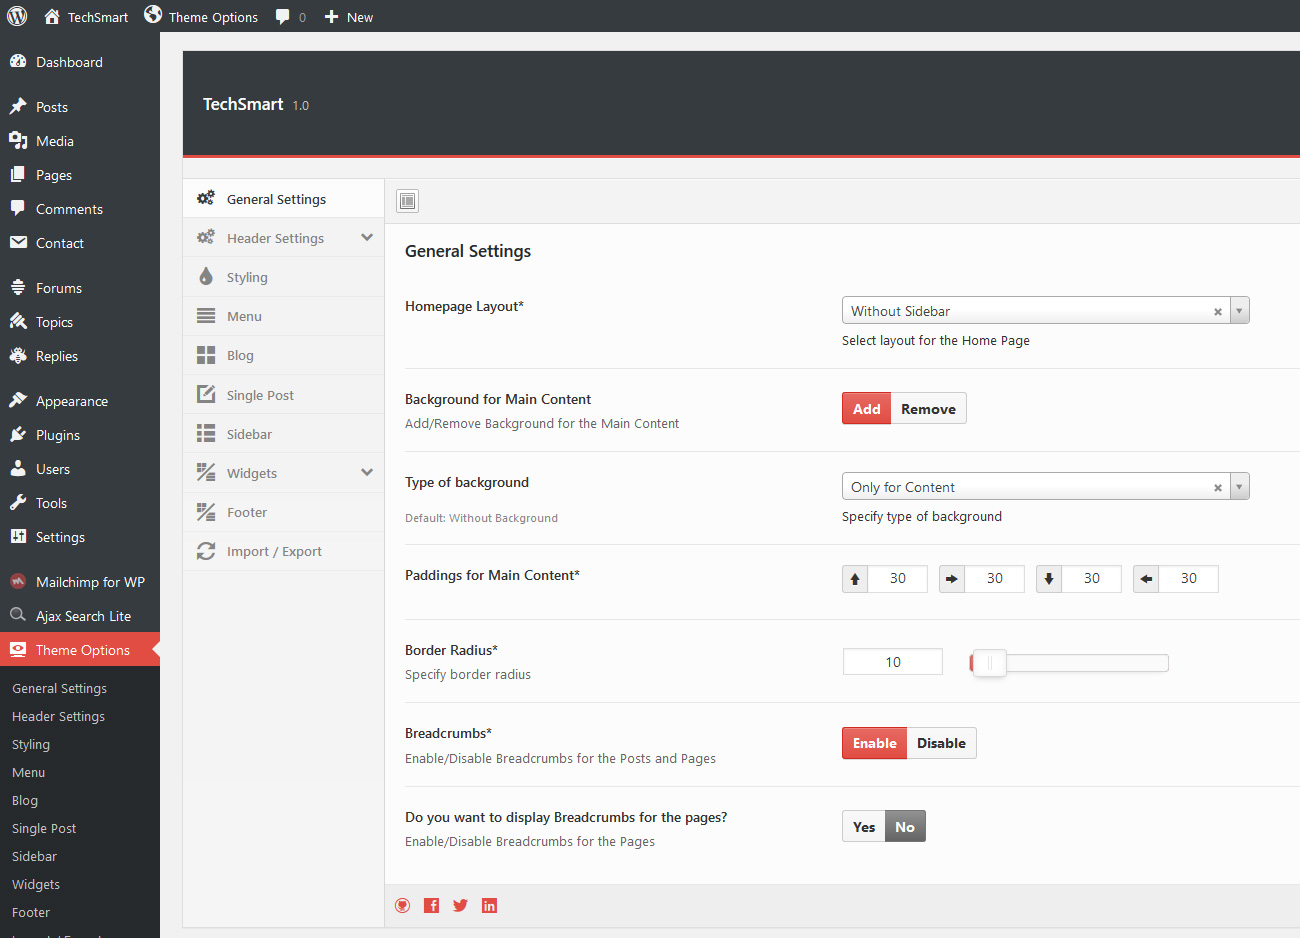
IMPORTANT (Redux Framework plugin must be installed and activated): Before first theme using you have to reset all options. Go to "Dashboard -> Theme Options" and click "Reset All" button. After reset options you have to click "Save Changes" button.
Theme has 9 Main Options Sections + 12 Subsections. You can configure each element very easy, just change options and click "Save Changes" button.
Color Options
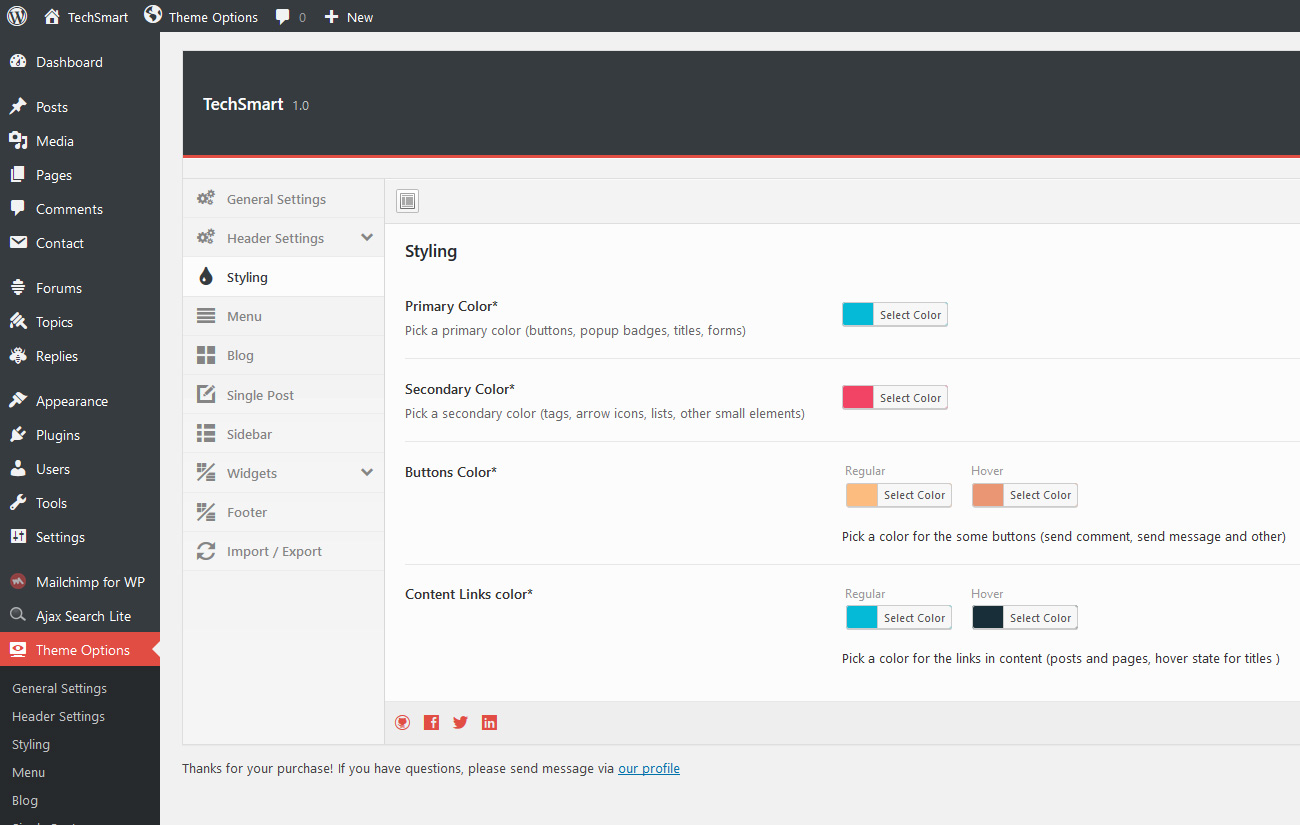
All main elements have color options via "Theme Options -> Styling" tab. It's "Primary Color", "Secondary Color", "Buttons Color" and "Content Links Color".
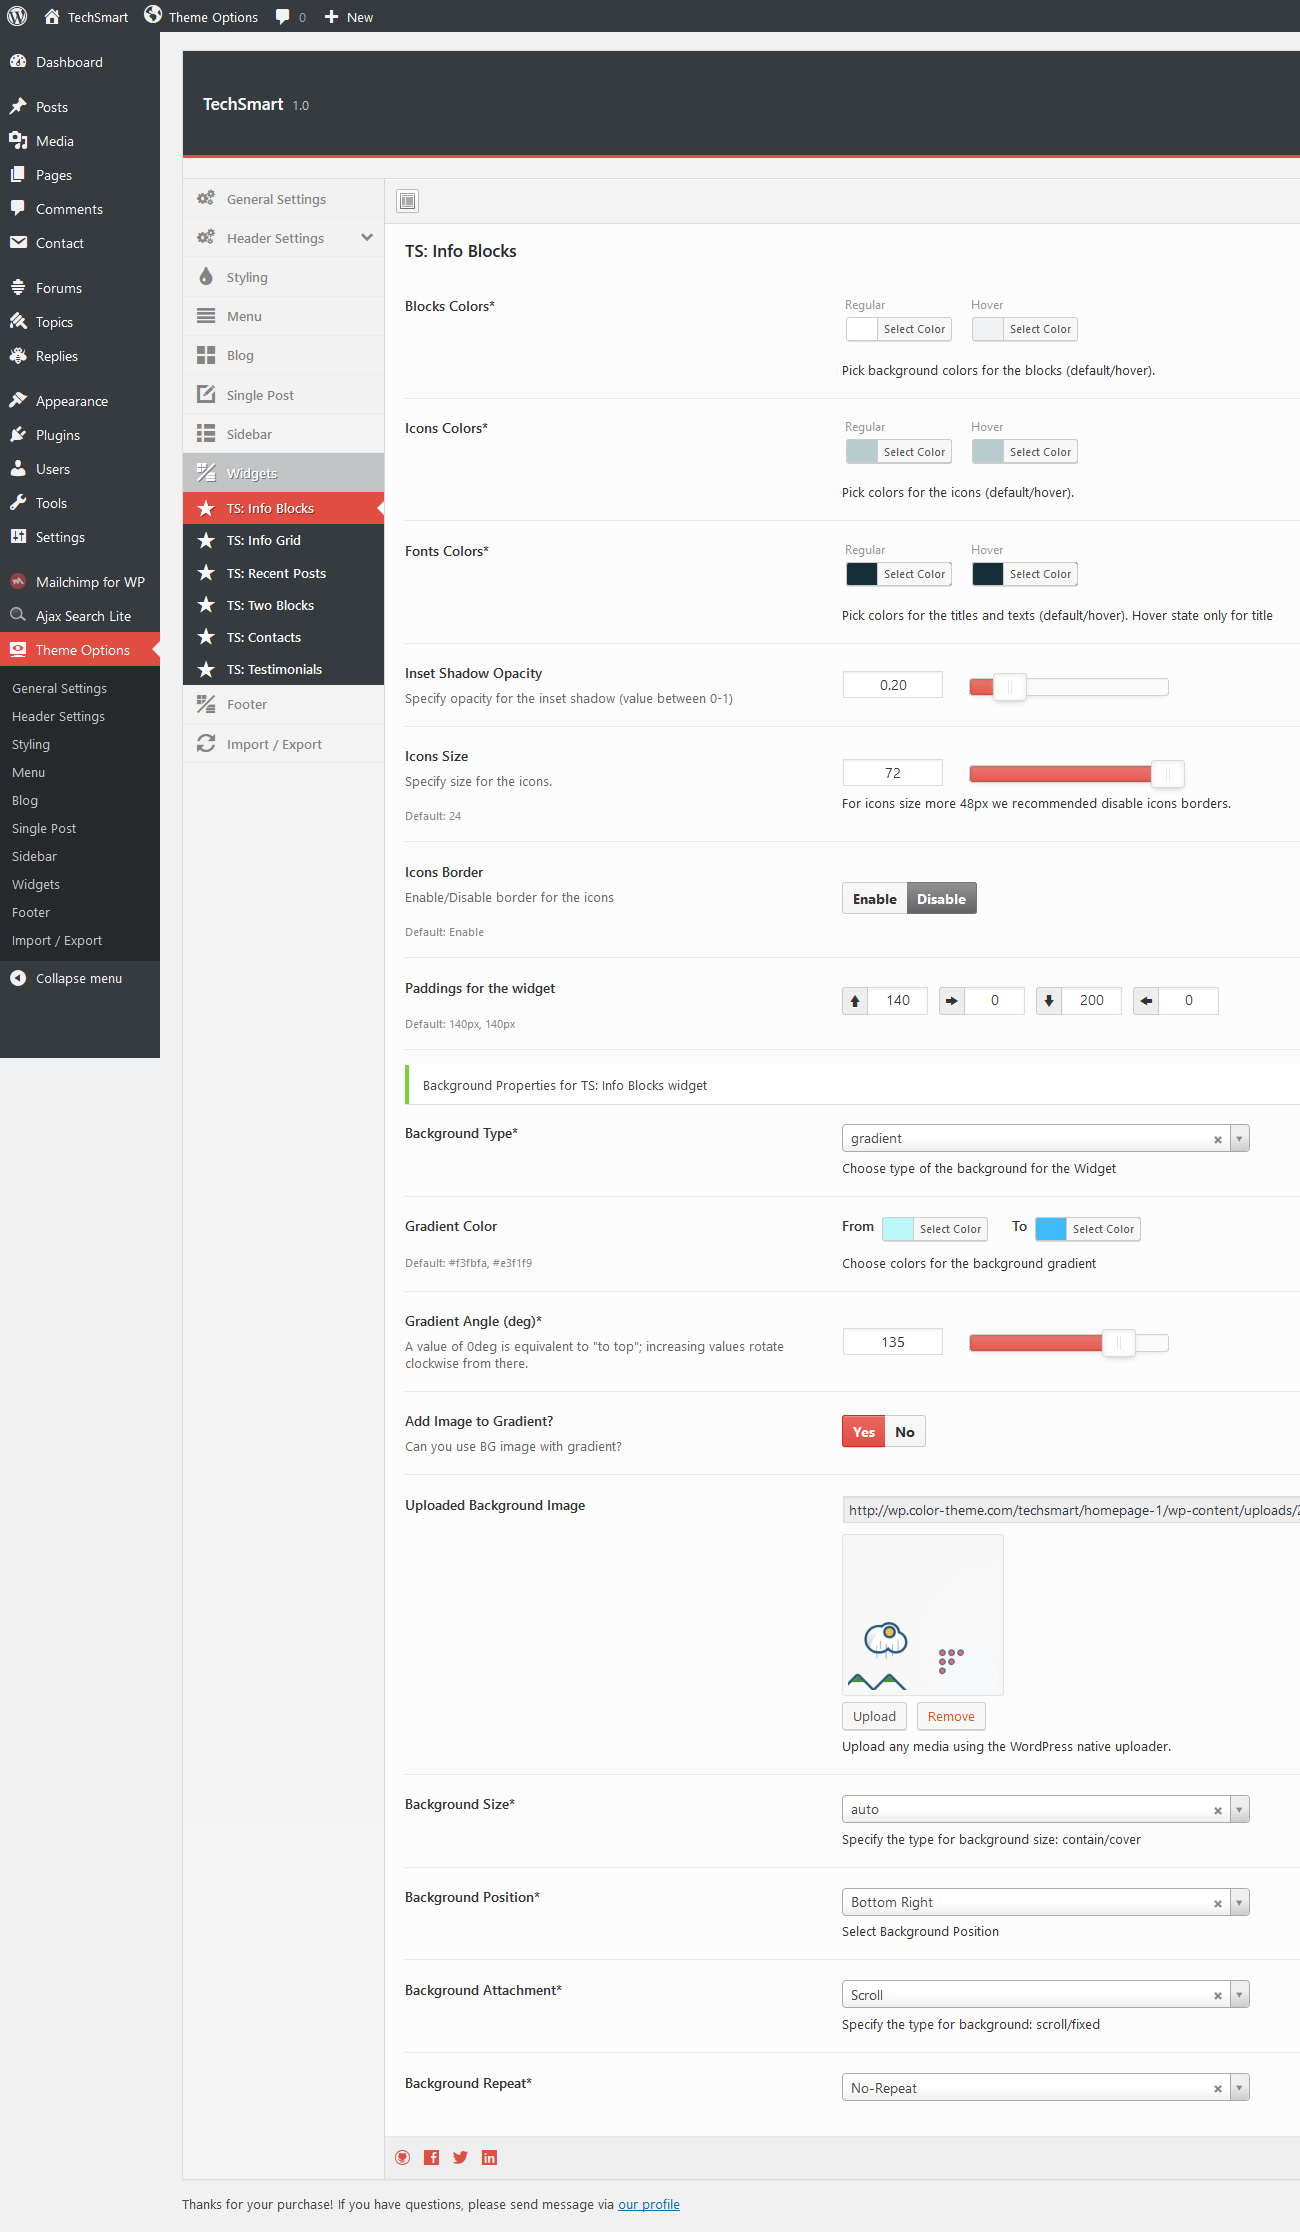
But all widgets and some website sections like "Header", "Footer", "Search Section", "Sidebar" have own styles: text size and colors, background options, color options and other.
Widgets have own design and color options
Home Page Setup
By default, after theme install, you have website - a blog. Your home page will display latest posts (articles) from your blog.
If you want create Helpdesk homepage with widgets, you have to use page template and static pages in WordPress
What do you must to do?
Just follow next steps:
-
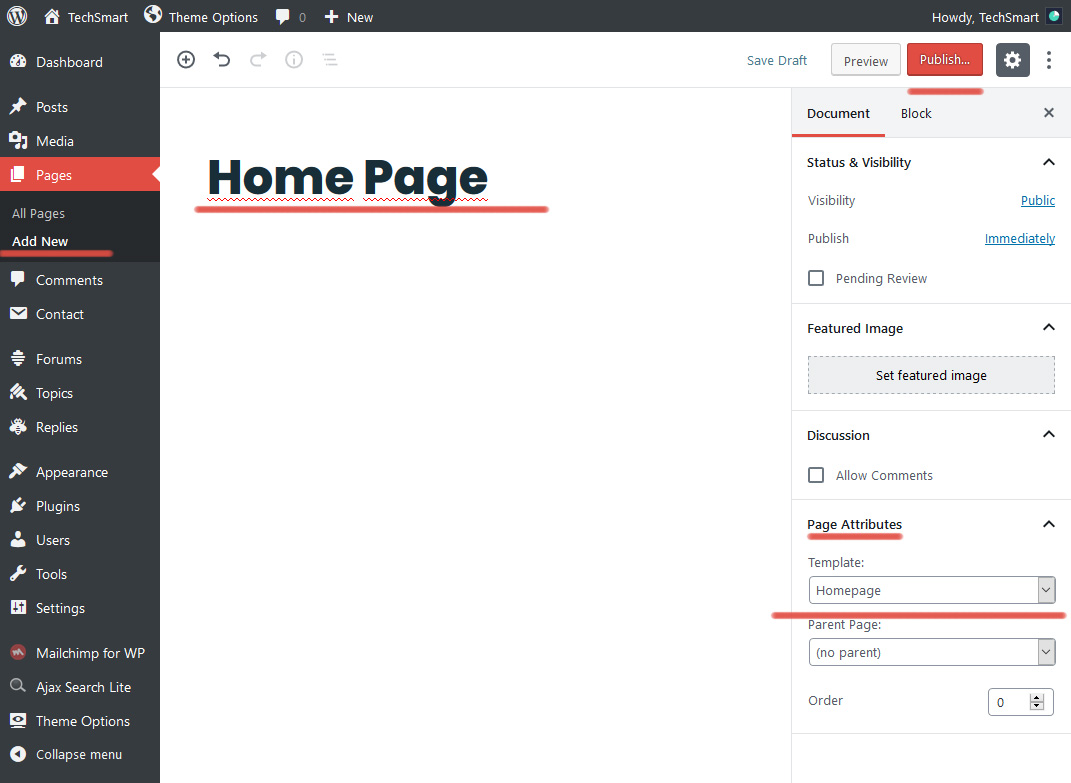
Go to "Pages -> Add New". Create and publish new page with page template - "Homepage"
-
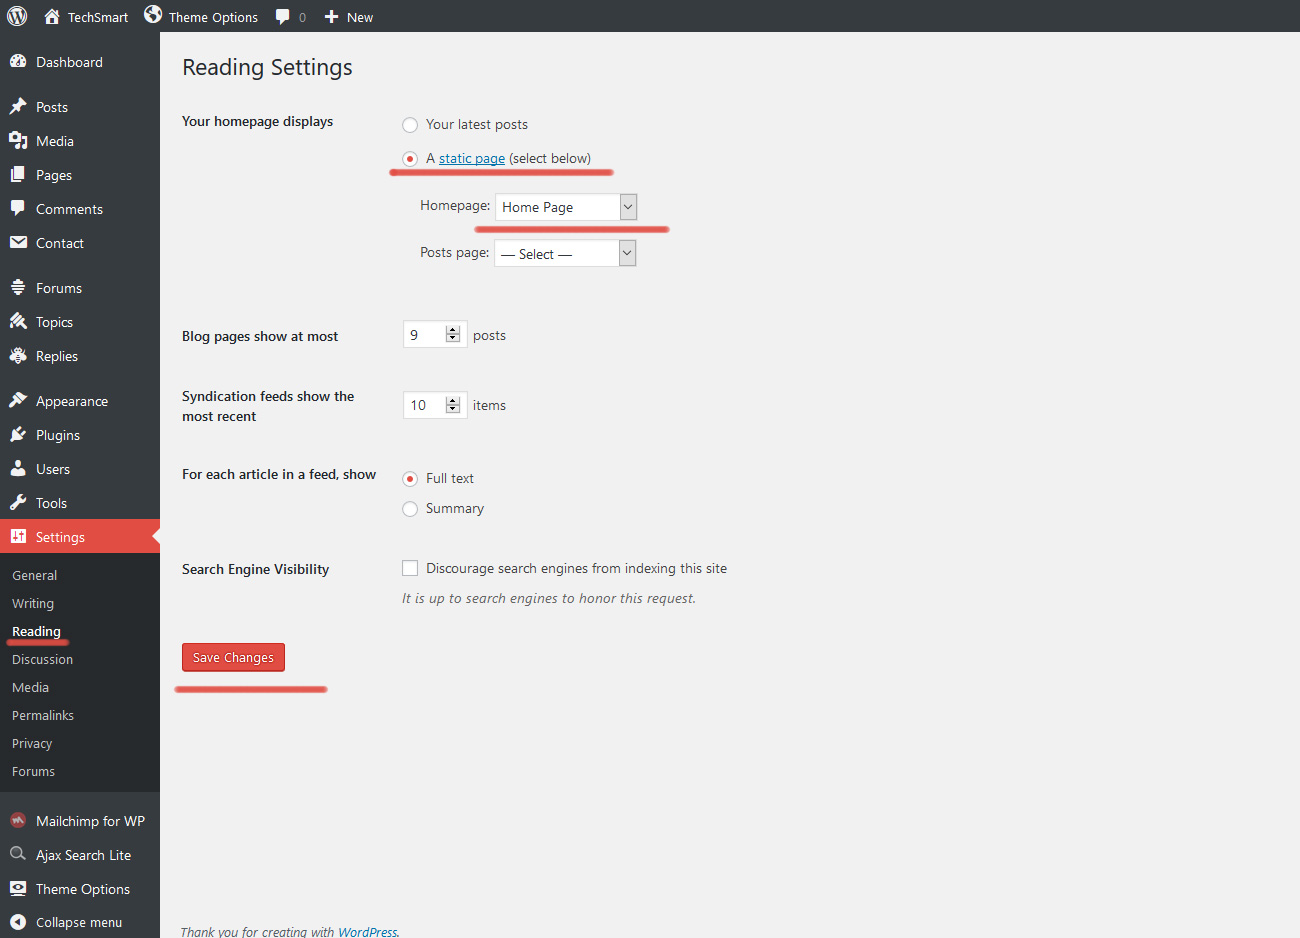
Go to "Settings -> Reading" and set "Your homepage displays" in "A static page (select below)"
-
Specify our new page template from step 1)
-
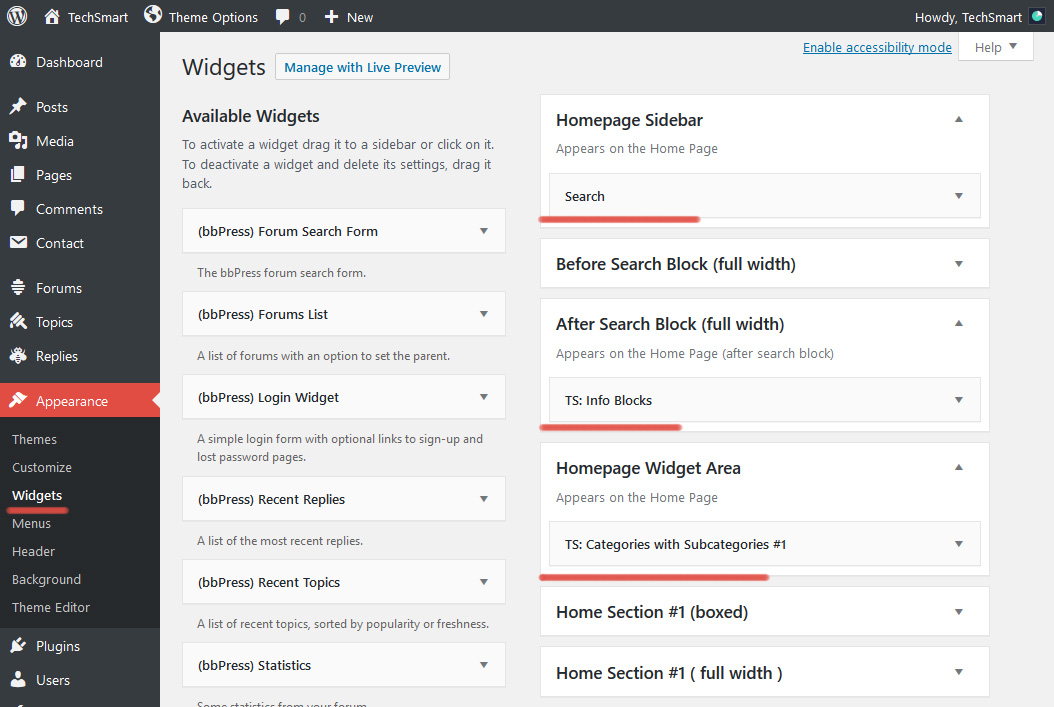
Now you can add widgets to your home page. Go to "Appearance -> Widgets" and choose widgets which you need.
More information about widgets in WordPress you will find in WordPress Widgets
Header Setup
TechSmart theme has 7 headers layout and tons options for customizing

You can use subsections for configure blocks in the header

Copyrights
Theme Images
All images files in posts were taked from https://unsplash.com/.
JS Libraries & Scripts
- Theia Sticky Sidebar v1.5.0 - Plugin Page
- jQuery Superfish Menu Plugin - v1.7.6 - jQuery Superfish Menu Plugin
- hoverIntent v1.8.1 - hoverIntent v1.8.1
Bootstrap & FontAwesome CSS Libraries
- Bootstrap 4.1.3 (minified version from Bootstrap CDN) - Bootstrap 4.1.3
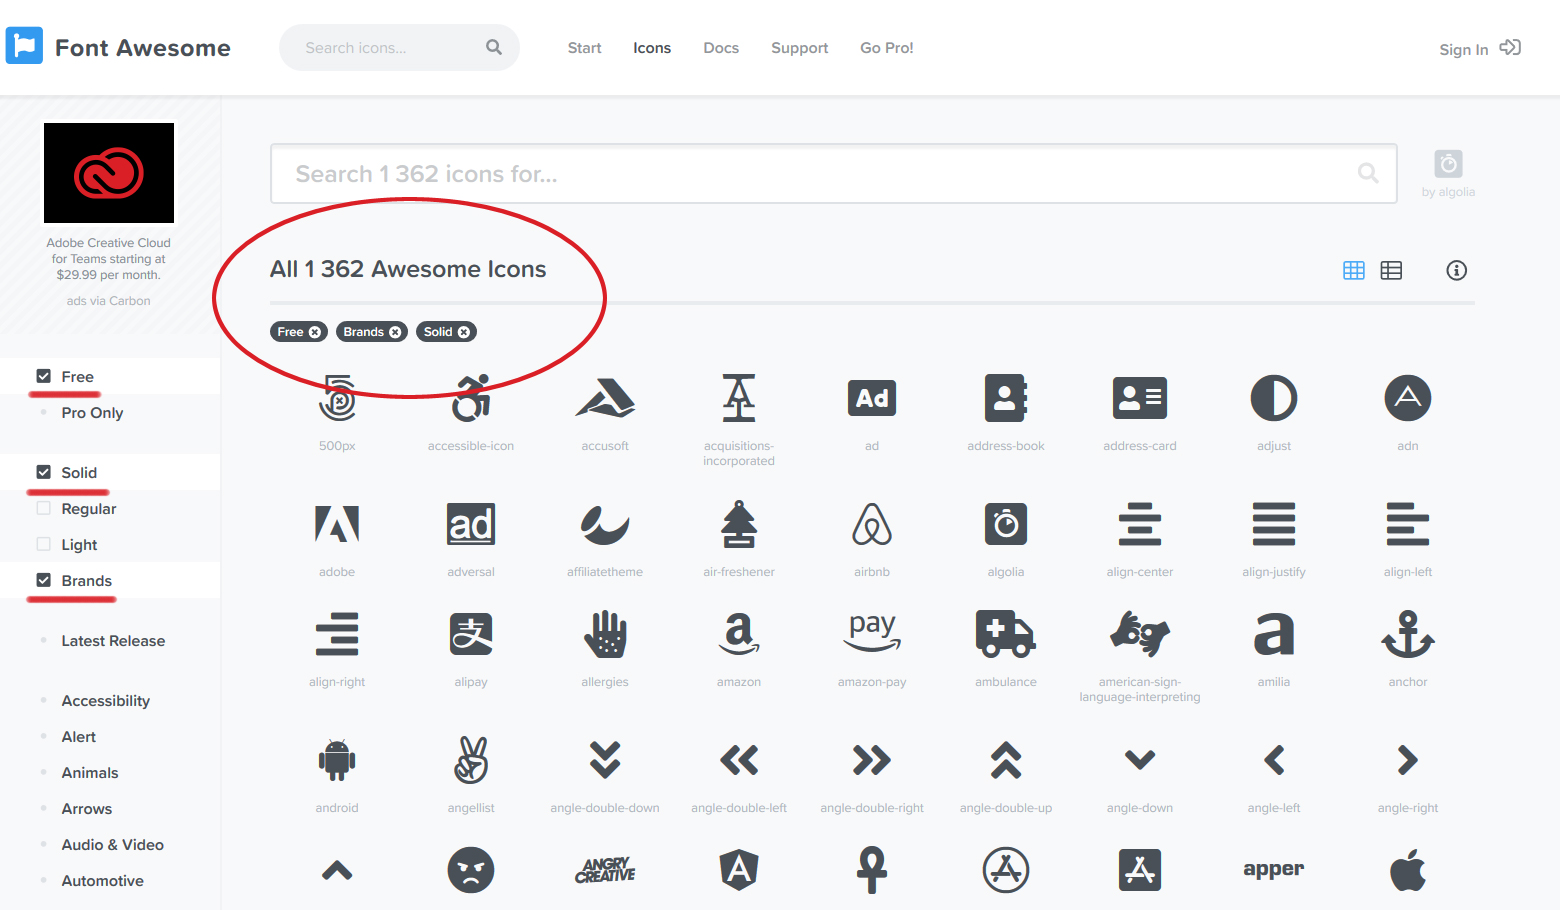
- FontAwesome 5.8.1 - Theme uses Solid & Brands Icons from FontAwesome.
All files are including from FontAwesome servers:
https://use.fontawesome.com/releases/v5.8.1/css/fontawesome.css
https://use.fontawesome.com/releases/v5.8.1/css/solid.css
https://use.fontawesome.com/releases/v5.8.1/css/brands.css
Important: When you will use icons for widgets in the theme you must to searching for icons only with filters: Free + Solid + Brands"
Thank You!
Thank you for buying our theme. We really appreciate it and always ready to help you with configure your site.
If you can't find your answer in this documentation, please send your questions via Our Profile.
Usually, we send answer in 24 hours
Choose Your Site

